 Save to Pinterest
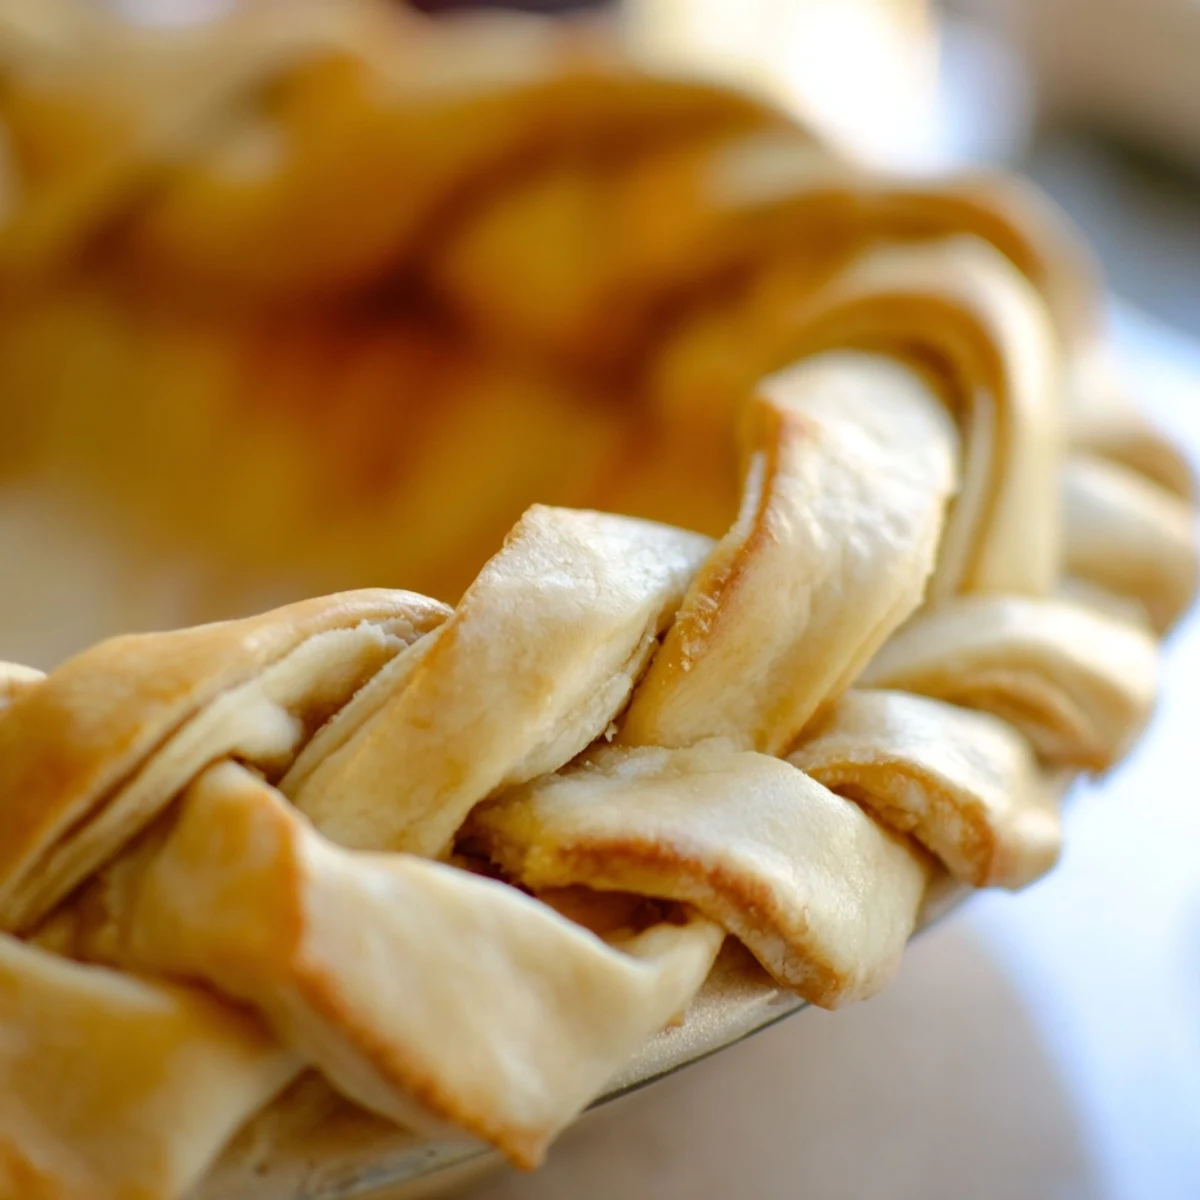
 This decorative crust technique creates a stunning fishtail braid edge that transforms ordinary pies into bakery-worthy showstoppers. The method involves cutting dough strips into quarters and weaving them in an over-under pattern, resulting in an intricate braided border that's surprisingly achievable for home bakers.
Perfect for both sweet fruit pies and savory quiches, this versatile decoration works with any standard pie dough recipe. The total process takes about 45 minutes from start to finish, with active preparation time around 30 minutes. You'll need basic tools like a rolling pin, sharp knife or pastry wheel, and pastry brush.
The key is working with well-chilled dough and using ice water to help seal the braided strips to the crust edge. Blind baking at 400°F for 12-15 minutes ensures the decorative braid maintains its shape and achieves a beautiful golden finish. This technique yields one 9-inch crust with enough braiding for the complete perimeter.
The first time I attempted a fishtail braid on a pie crust, my kitchen looked like a flour bomb had gone off. I was making a Thanksgiving pie and wanted to impress my in-laws with something beyond the typical crimped edge. Halfway through braiding, I realized I'd cut my strips too short and had to patch them together with water and desperate hope. That pie wasn't perfect, but everyone was so captivated by the intricate woven crust that nobody noticed the uneven filling underneath.
Last summer, my niece watched me make this crust and immediately asked to learn. We sat at the kitchen table, flour dusting our arms, while I taught her the over-under pattern that makes the braid dance. She made a miniature version in a tart tin and was so proud she carried it around like a trophy before we even baked it. Now every time she visits, she asks if we can make another braided beauty together.
Ingredients
- 2 1/2 cups (315 g) all-purpose flour: The backbone of your crust, providing structure and that tender flake we all crave
- 1 cup (225 g) cold unsalted butter, cubed: Cold butter is non-negotiable here; those tiny butter pockets create the magical flaky layers
- 1 tsp (5 g) salt: Enhances flavor and helps strengthen the gluten network for easier handling
- 1 tbsp (15 g) sugar: A subtle sweetness that aids browning and balances savory fillings beautifully
- 6-8 tbsp (90-120 ml) ice water: Add gradually and trust your hands; you want just enough to bring the dough together without making it tough
- 1 egg, beaten: Creates that gorgeous golden sheen that makes your finished pie irresistible
- 1 tbsp (15 ml) milk: Thins the egg wash for smoother application and deeper color
Instructions
- Mix the dry foundation:
- Whisk flour, salt, and sugar in a large bowl until they're one fragrant mixture
- Cut in the butter:
- Work those cold butter cubes into the flour with a pastry cutter or your fingertips until you see coarse, pebble-sized crumbs throughout
- Bring it together:
- Drizzle in ice water a tablespoon at a time, gently tossing with your fingers just until the dough holds together when squeezed
- Rest and chill:
- Divide dough into two discs, wrap tightly, and refrigerate for at least an hour; this relaxes the gluten and firms the butter for easier rolling
- Prepare the base:
- Roll one disc on a floured surface, press it into your 9-inch pie plate, trim the edges, and return to the refrigerator while you work on the braids
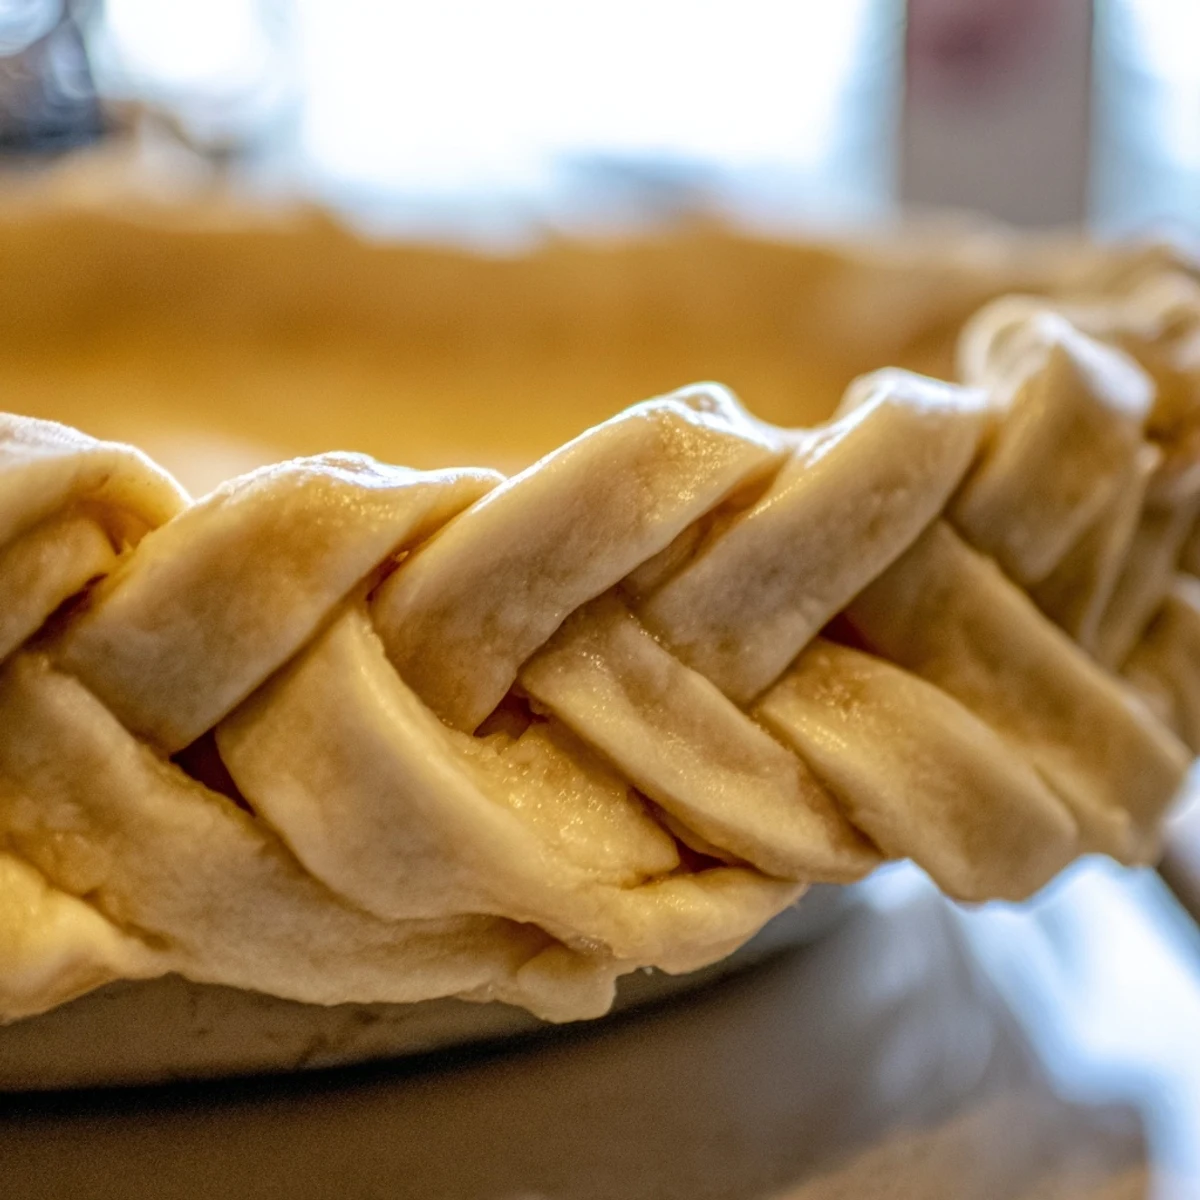
- Cut your strips:
- Roll the second disc to about 1/4 inch thickness and cut twelve long, even strips about 1/2 inch wide using a sharp knife or pastry wheel
- Create the braid sets:
- Group strips into three sets of four, pinching the tops of each set together to secure them before braiding
- Master the fishtail pattern:
- Label your four strips from left to right as positions 1, 2, 3, and 4; take strip 1 and weave it over 2, under 3, then over 4, repeating with the new left-most strip each time
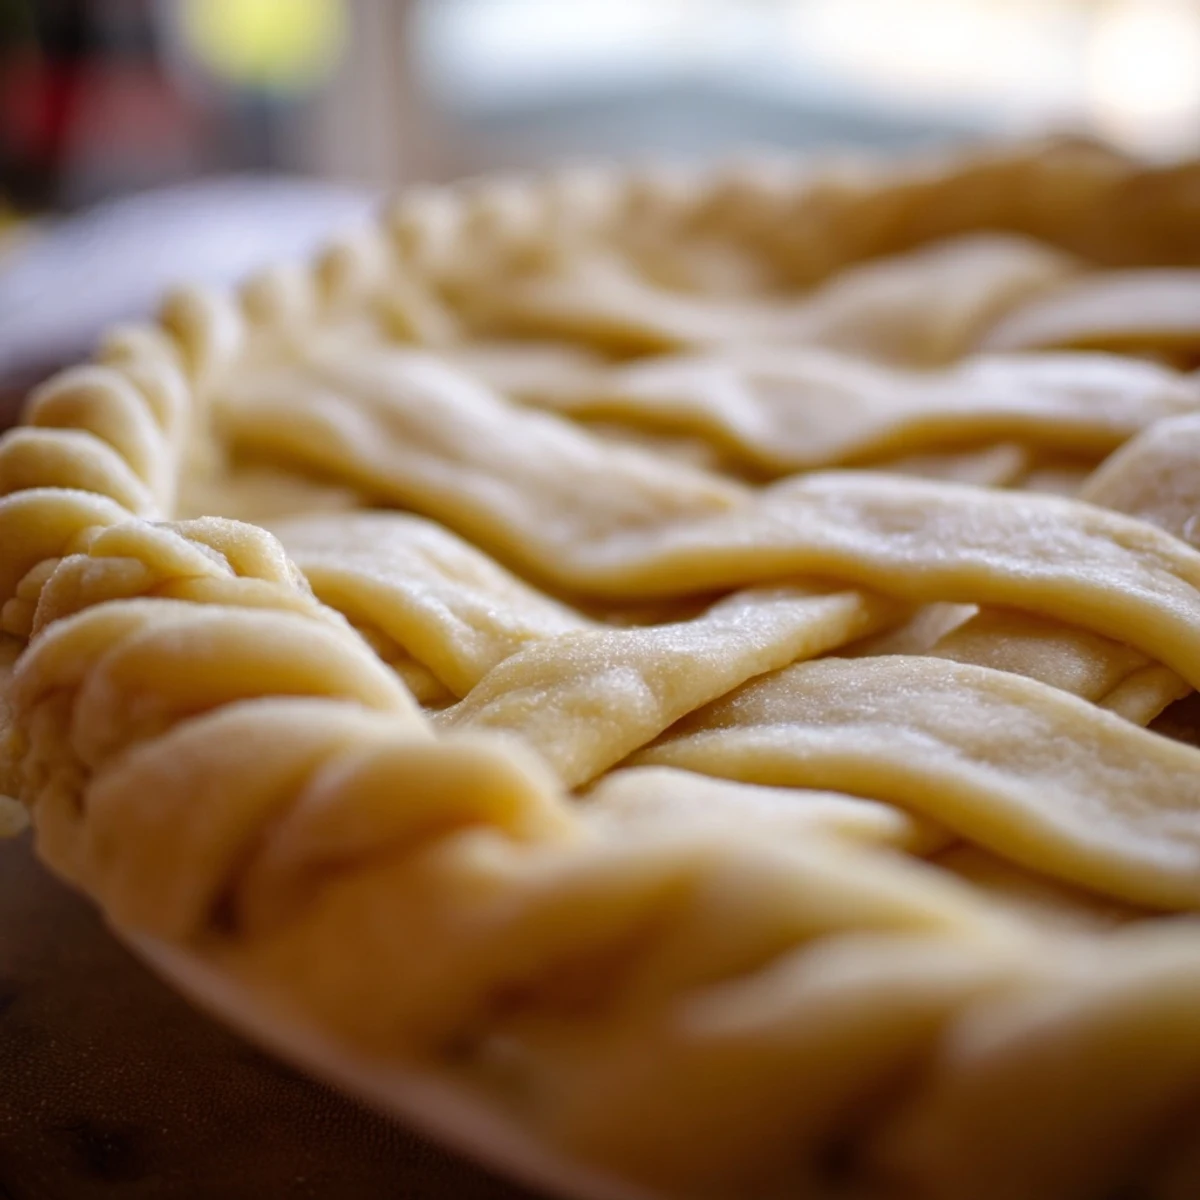
- Apply the braids:
- Transfer each finished braid to the chilled pie crust edge, pressing gently to seal and trimming any excess; use a dab of water if needed to help them adhere
- Chill again before baking:
- Refrigerate the assembled pie for 15 minutes while preheating your oven to 400°F; this prevents the braids from melting into a sad puddle
- Add the golden touch:
- Brush the braided crust with egg wash, blind bake with weights for 12-15 minutes until golden, then finish according to your chosen filling recipe
 Save to Pinterest
 I once brought a braided apple pie to a potluck and watched three different people take photos before anyone even took a slice. Something about that woven edge makes people feel special, like you went above and beyond just for them. That's the magic of handmade food; it communicates care without saying a word.
Working with Gluten-Free Flour
When substituting gluten-free flour blends, expect a slightly softer dough that benefits from longer chilling time. The braids may feel more fragile, so work quickly and handle gently. A bench scraper becomes your best friend for transferring strips without tearing.
Sweet vs Savory Applications
For fruit pies, add a pinch of cinnamon or cardamom to your dough; for savory quiches, try incorporating dried herbs like thyme or rosemary directly into the flour mixture. The braided edge works beautifully for pot pies too, creating that farmhouse aesthetic that makes comfort food feel even more comforting.
Timing Your Braid Assembly
I've learned that the braiding step takes longer than expected, especially your first few times. Factor in about 20 minutes just for the weaving, and don't start if you're rushing to get dinner on the table. The finished crust is worth every extra minute.
- Practice the fishtail pattern with pieces of twine or yarn before committing to dough
- Keep a small bowl of ice water nearby for sealing edges and patching any tears
- If a braid breaks, don't panic; simply press it back together and the egg wash will hide the seam
 Save to Pinterest
 There's something deeply satisfying about creating something so beautiful with your own hands. Every time you pull a golden, braided pie from the oven, you're not just baking dessert; you're making a memory.
Recipe FAQs
- → Can I make the fishtail braid crust ahead of time?
-
Yes, prepare the braided crust up to 24 hours in advance. Wrap the assembled pie tightly in plastic wrap and refrigerate until ready to bake. The chilling time actually helps the braid hold its shape better during baking.
- → What type of pie dough works best for braiding?
-
Standard all-butter pastry dough works excellently for braiding. The butter creates flaky layers while providing enough structure to hold the braid shape. Avoid overly soft or sticky doughs, as they're difficult to work with for detailed decorations.
- → How do I prevent the braid from unraveling during baking?
-
Ensure your dough strips are well-chilled before braiding and press the ends firmly together. Pinching the braid ends to the main crust and brushing with water helps create a strong seal. A final chill of 15 minutes before baking is crucial for stability.
- → Can I use this technique on store-bought pie crust?
-
Absolutely! Thaw frozen pie dough according to package directions, then roll out and cut into strips. Store-bought dough works beautifully for this decorative technique and saves significant preparation time.
- → What fillings pair well with this decorative crust?
-
This versatile crust complements both sweet and savory fillings. Try it with apple, cherry, or berry pies for desserts, or use it for quiches, chicken pot pies, and vegetable tarts. The neutral buttery flavor enhances any filling.
- → How do I know when the braided crust is fully baked?
-
Look for a deep golden brown color across the braid surface. The edges should be firm to the touch and the braided texture should be clearly defined. If blind baking, the bottom should appear dry and set, not doughy or pale.
